Saturday, June 13, 2009

Last Night's Dinner: Grilled Portobello Bruschetta

My dear husband loves to grill, bbq, smoke meats, well anything that involves cooking outside! The only problem when he does this, is that he hardly ever considers (or makes) a side. No matter how many times I tell him, he still believes that meat can make up a whole meal!
Well one of very few friends that actually visit us, told us recently that he has decided to be a vegetarian. My husband and I agreed to make a nice vegetarian meal for him on the grill. This was a challenge for my hubby, but not me. I played with this and that and came up with my very first bruschetta recipe!

GRILLED PORTOBELLO BRUSCHETTA

4-6 large portobello mushroom caps
2 medium roma tomatoes
1 .66oz package of basil leaves (about 2-3 tbsp or 10-20 leaves maybe)
4-5 cloves garlic
4(ish) tbsp extra virgin olive oil
4-6 thick slices of mozzarella cheese

First we are going to get the topping ready. Throw the garlic in the food processor and turn it on until the garlic is minced(ish). Cut the tomatoes in half and remove the stem section, plop these, along with the basil leaves, into the food processor. Add a touch of oil, maybe 1 tbsp or less. Pulse this just a few times until the tomatoes are diced to about 1/2 to 1 inch chunks. Set this aside (maybe in the ice box if you like the contrast of hot and cold).

Then rinse the mushroom caps, and clean them the best that mushrooms can be cleaned. Brush them with remaining olive oil. You don't have to use it all, just make sure they are covered! Place caps on the grill for about 5-10 minutes on each side. When the mushrooms are just about tender place the cheese inside the cap, kinda like a bowl. Once the cheese melts a little remove from grill and top with bruschetta topping.

NOTES: I used a box of basil I bought at Kroger, most grocery stores have these now in the produce section. I really don' t remember how much was in it but it said it was .66 oz.

The first time I made these I saved some of the bigger leaves and put one on top of each muchroom before serving. It made them really pretty! :)

My husband hates mushrooms, but with this recipe he says he has been converted!

MY RATING: 5 out of 5 mushrooms! YUMMY!
Thursday, March 5, 2009

Last Night's Dinner: Curried Chicken Soup

So the other night I gave my eldest daughter and my husband a choice for dinner. Their choices were curry with rice or curried chicken soup, either way they were going to get chicken curry! Well my daughter loves the curried chicken soup, so picked that. Then my husband picked the curry with rice. So we had the curry with rice then last night we had the curried chicken soup. This may be enough curry for the week!
Anyway, I got this recipe from the Rachel Ray magazine (http://www.rachaelraymag.com/recipes/soup-stew-choup-recipes/curried-chicken-soup/article.html). They usually have this pull out section for 7 days worth of dinners with a shopping list. I did it and found this little treasure! Enjoy!


CURRIED CHICKEN SOUP 

2 tablespoons butter
1 bunch scallions, white and green portions thinly sliced separately
1 red bell pepper, finely chopped
2 teaspoons curry powder
One 32-ounce container (4 cups) chicken broth
1 head cauliflower, cut into florets
1 large baking potato (12 to 14 ounces), peeled and cut into small cubes
1 rotisserie chicken, skin discarded and meat shredded
One 15-ounce can chickpeas, rinsed
Salt and pepper
3/4 cup plain whole milk yogurt

In a large saucepan, melt the butter over medium heat. Add the scallion whites, bell pepper and curry powder and cook, stirring, until tender, about 3 minutes. Add the chicken broth, cauliflower and potato and bring to a boil. Lower the heat, partially cover and simmer until the vegetables are tender, 10 to 12 minutes.

Stir in the chicken and chickpeas and cook until heated through, about 2 minutes. Stir in the scallion greens and season with salt and pepper. Stir in the yogurt just before serving.

NOTES: The rotisserie chicken is just a quick way to get around cooking the chicken. I like to buy those cheapo chicken breast strips (I think they are left overs or something that the meat ppl just try to sell off) cube them up and fry them until they are no longer pink.

Monday, March 2, 2009

Tonight's Dinner: Salmon Patties

So as I was grocery shopping last week I happened to notice that the canned salmon was on sale. I remember my mother making mackerel patties when I was younger and I have tried it a couple of times since I've grown up. I never wrote down the recipe, which isn't really a recipe, more like a thought or a memory, it may have never been written down. So I decided to find my own salmon patty recipe. While I was searching two really popped out to me, one from a southern cooking website and one from a health and fitness website. I chose the healthy one. It calls for Old Bay seafood seasoning but I didn't have any so I made my own substitute, which I though turned out good and my kids loved it. I just need to wait for my husband to come home to eat so I know what another adult thinks of it. I served this with a mushroom rice and italian cut green beans. The nice thing about the healthy website recipe is that it includes the nutritional facts! http://www.answerfitness.com/232/salmon-patties-recipe-healthy-recipes-snacks/

SALMON PATTIES

1 can (14 3/4 oz) canned Red Sockeye or Pink Salmon (I prefer Sockeye, which has a deeper red color, a little more flavor and is higher in Omega-3s than Pink Salmon.)
1 tbs fresh lemon juice, or one packet True Lemon
1-1/2 tbs Dijon style mustard
3/4 cup oat bran or quick oats
2 tbs dried onion flakes
1/2 cup sliced green onions (white part and some of the green) — Optional
Three egg whites
1 tsp Old Bay Seafood Seasoning
Salt and Pepper to taste

In a large glass mixing bowl, (reserving some of the “broth” on the can) drain and flake the salmon. If you want to remove the skin and bones, do it at this point and discard them (or feed them to the cat or dog!) Add the lemon juice or Real Lemon,  egg whites, dried onion flakes, Dijon mustard and Old Bay seasoning to the bowl and mix until well blended. If the patties are a little too dry, you can add a bit of the salmon broth you reserved from the can, or a bit of water. If they are too moist, add a tbs or two of additional oat bran or quick oats. The salmon patty mixture should be fairly most and easy to form into a patty, while retaining it shape and not “cracking.” If the salmon patty “cracks” when you are forming it, it’s too dry and you should add some a tablespoon or so of water or salmon broth.

Form the mixture into four to five patties, placing each patty on waxed paper while making the others.

Lightly oil a non-stick pan with 1 tbs of walnut, olive or canola oil. Add the patties and cook over medium-high heat until golden brown on both sides (about 10-15 minutes.) Or, you can bake the salmon patties in the oven until golden brown at 350 degrees. You can also grill the patties.

Serve the salmon patties on their own with brown rice or brown rice pilaf and a side vegetable, or a baked sweet potato with low-fat quark and vegetable. You can also serve the patties burger style with the usual burger condiments on a 100 percent whole wheat bun, or between two slices of of toasted Ezekiel 4:9 sprouted grain bread.

NOTES: There is a recipe for Old Bay seasoning here: http://www.cookingcache.com/jargifts/oldbayseasoningmixinajar.shtml?rdid=rc1 

I didn't have all the ingredients for this mix so I used a shake of each of these, dry mustard, black pepper, ground nutmeg, ground cloves, paprika, and onion powder (instead of the dry onion flakes).

I also didn't use any lemon juice or "true lemon" or green onions. 

FUNNY NOTE: As I finish typing this Good Eats has come on my television and it is all about salmon! It's title "Gills Gone Wild" :)

Friday, February 20, 2009

Tomorrow's Lunch: Asian Beef and Noodles

I tried this a couple months ago, when I made it I used beef flavored ramen noodles. It turned out ok but it just wasn't filling. I definitely would not make it for dinner, that is why I'm putting it into the lunch category. This came from a cookbook I bought from a school fund raiser, it is under the meats and main dishes section. I like it because it is a reletivly cheap and easy lunch, you could probably even omit the hamburger!

ASIAN BEEF AND NOODLES

1 lbs ground beef
2 packages (3 oz each) oriental ramen noodles, crumbled
2 1/2 c water
2 c frozen broccoli stir-fry vegetables
1/4 tsp ground ginger
2 tbsp thinly sliced green onion

In a large skillet, cook beef over medium heat for 4-5 minutes or until no longer pink; drain. Add the contents of one ramen noodle seasoning packet; stir until dissolved. Remove beef and keep warm. In the same skillet, combine the water, vegetables, ginger, noodles and contents of remaining seasoning packet. Bring to a boil. Reduce heat; cover and simmer for 3-4 minutes or until noodles are tender, stirring occasionally. Return beef to the pan; cook for 2-3 minutes or until heated through. Stir in onion. Yield: 4 servings.

NOTES: I used a bag of frozen broccoli when I made this, I also didn't use any green onions. 

What I like about this recipe is that (1) it is adding nutrition to something that has virtually none, (2) it is a one dish meal, (3) it is inexpensive!

Like I said before you can substitute hamburger with more veggies, ground turkey or chicken, or maybe even tuna...I'll have to try that! :)

MY RATING: 2 1/2 noodles out of 5

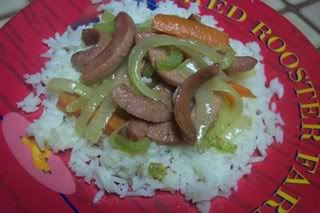
Last Night's Dinner: Hot Dog & Veggie Stir-Fry

I really thought my kids would like this alot more than they did. They only eat the hot dogs and carrots. I found another cheap stir-fry recipe in a cookbook, I'm going to try to post it later. I like them because they are cheap and easy. The family gets the junk food they want and I feed them the veggies they need! I love mixing veggies into things that aren't so healthy! You can do it with almost anything, but I'm starting to ramble.
This recipe was found at the HBHW site, what can I say, I love that place! http://www.hillbillyhousewife.com/hotdogstirfry.htm

HOT DOG & VEGGIE STIR-FRY

Photobucket

4 to 6 hotdogs or 1 can of SPAM or 8-ounces of baloney
2 tablespoons oil
4 large carrots
2 or 3 stalks celery
1 onion, sliced
Garlic Powder, Salt & Pepper to taste
Cooked Rice

When you prepare this recipe, you may use whichever meat you have available. They all taste good in this recipe. Try to cut the meat into narrow "match-stick" sized pieces. This shape is called julliene. I cut the hotdogs by slitting them long-ways into 4 to 8 long "worms". Then I quarter them short-ways to get a lot of pretty, skinny julliened hotdogs. Baloney can be stacked after removing the red plastic, and then cut into long skinny strips. Cut the Baloney in half, or thirds the other way and you will have pretty pieces. The SPAM is easy to cut and stack and slice into slivers.

The carrots are cut into narrow slices and then each slice is cut in half. The celery is cut into thin slices and the onion is halved and then sliced into thin half-moons. After preparing the vegetables and meat set it all aside.

Heat the oil in a large skillet over high heat. Add the vegetables. Stir-fry the veggies for at least 5 minutes, or until the onions begin to turn tender. Add the hot dogs or other meat. Cook and stir until the meat browns slightly. Season with Garlic, Salt & Pepper to taste. Add about 2 or 3 tablespoons of water to the skillet. Stir quickly until the water evaporates. There, you are done. Serve the stir-fry over cooked rice. Makes 4 servings.The spiciness of the meat, the sweetness of the carrots, the subtle bitterness of the celery and the piquancy of the onions make this dish quite good.

VARIATION: If desired you can add 2 or 3 cups of finely sliced cabbage in addition to the other vegetables. Add them to the dish along with the other veggies.

Homemade bean sprouts are also a nice addition. Add them at the end, right before servings. Bean sprouts are best if they aren't overcooked.

NOTES: I've tried it with regular hot dogs and spam and I definately prefer the beef hot dogs. I also like to throw a splash of soy sauce on mine, the kids don't like it so I don't add it to the pan.

Make this fun and get the kids involved. Teach the kids how to use chop sticks or make some of your own fotune cookies! I'll see if I can find my fortune cookie recipe, if not I'll search for one and post it! :)

MY RATING: 3 1/2 hot dogs out of 5

Monday, February 16, 2009

Last Night's Dinner: Sloppy Joe Casserole

So I know it isn't the healthiest thing in the world, at least not the way I made it. I just had some Manwich in the cabinet, a roll of cresent rolls in the fridge and no bread or buns. It was cheap to make which is something I am looking for in recipes. I will give some suggestions at the bottom of the recipe (in the notes) about how you can make it better.

SLOPPY JOE CASSEROLE

1 lbs hamburger
1 can sloppy joe mix
1 roll cresent rolls
12 oz frozen corn

Heat oven to 425 degrees. ake corn out of the freezer and let it sit at room temp. Lay half of the cresent rolls flat on the bottom of a 9x9 pan and bake for 10 minutes until lightly golden.
Meanwhile brown hamburger. Make sure you break it up with the back of your spoon as it starts to brown, try for smaller than a dime in size. Once hamburger is brown drain it and mix in sloppy joe mix and partially thawed corn.
Layer sloppy joe/corn mix on top of already golden brown cresents. Top with the other half of uncooked cresents and bake for about 10 minutes but no more than 15. You want the top to be a nice golden brown.

NOTES: There are tons of recipes online for homemade sloppy joe mix. I really like knowing what is going into my food so this is what I'm going to try next time I make this.

You can also use ground turkey instead of hamburger.

Bisquits may be another option for the bread part (instead of the cresents). Things that are made from stratch are always so much better in my opinion.

Also I used mixed white and yellow corn in this but either would probably work just fine.

You could also add a layer of shredded cheese between the sloppy joe mix and the top layer of cresents.

MY RATING: 3 out of 5 Joes!

Thursday, February 5, 2009

Snack/Dessert: No Marshmallow Rice Krispie Treats

So I bought a big box of Rice Krispies to make some treats with some marshmallows I had sitting around. I ended up not having enough marshmallows and totally messed up the whole batch! So here I am with a big box of cereal and my girls were just not eating it so I had to come up with something. First I looked for a recipe that had Rice Krispies but was not for the treats, this is nearly impossible. So I decided to try to find a recipe for Rice Krispie Treat that had to marshmallows and this is what I found.

NO MARSHMALLOW RICE KRISPIE TREATS

1 c. brown sugar
1 c. brown rice syrup
1 c. peanut butter
7 c. puffed brown rice cereal

Combine sugar and brown rice syrup in saucepan and bring to a near boil while stirring often. Continue stirring until sugar dissolves.
Remove from heat.
Add peanut butter and mix well.
Add puffed rice and mix well.
Press the mixture into a greased pan and put in the fridge for several hours to cool and harden. If you want it to harden faster, stick it in the freezer for about an hour.
Cut into squares and enjoy

NOTES: I used Rice Krispies instead of puffe brown rice cereal and light corn syrup instead of brown rice syrup. They turned out good.

You can use pretty much any cereal you want/have, a friend of mine said she made something like this with grape nuts.

I also cut the recipe in half and used a 9x9 pan, they came out thick and I cut them into bars instead of squares.

MY RATING: 5 treats out of 5

This Morning Breakfast: Yogurt Muffins

I know I haven't blogged in a while so I'm going to try to put a couple up. I am going to start things off with a twist, how about some breakfast? I got this idea for some yogurt muffins and instantly ran to the computer to in a recipe and this what I found. Original recipe

YOGURT MUFFINS

Photobucket

1 3/4 cups all-purpose flour
1/3 cup sugar1 teaspoon baking powder
1/2 teaspoon baking soda
1/2 teaspoon salt
1 carton (6 ounces) yogurt (any flavor)
1/3 cup oil1 egg

Preheat oven to 400˚F. Spray, grease or put paper liners in 12 (2 ¾ inch) muffin cups. In medium mixing bowl, stir together dry ingredients. In small bowl, beat together yogurt, oil and egg. Stir yogurt mixture into dry mixture until just blended. Do not overmix. Spoon into prepared muffin cups. Bake until nicely browned, about 20 minutes.

NOTES: The original recipe called for raspberry yogurt and raspberries, but I used mixed berry Activia and no berries. The nice thing about this recipe is that you can use frozen berries without defrosting them. Check out the original recipe to find out how and when to add the berries.

This recipe made 12 muffins.

MY RATING: 5 out of 5 muffins!